Activity Guide | Downtown Bracket Challenge
Activity Guide | Downtown Bracket Challenge
OVERVIEW
The Downtown Bracket Challenge applies the bracket idea often used in sports competitions to engage people to vote on a creative placemaking project while supporting a good cause to benefit local nonprofit organizations. Community members are invited to donate items for the local non-profit organizations which is tallied as votes for the project of their choice to be installed in the community. After 3 rounds of voting, the winning project is identified and then implemented using previously identified funds. This process allows placemaking efforts to be developed along with community engagement.
This project is an example of how placemaking can be postured in a smaller community to make it more relevant and place based. Ultimately, this project furthers the practice of placemaking by highlighting the importance of knowing one’s audience, and pilots a way to engage a broader community in ways that are easily relatable and understood.
Key Details of this Project:
- Downtown Bracket Challenge is a placemaking project that allows people to vote on a project they would like to see installed in their community.
- Voting is done through donations, supporting local needs while providing a tangible way to count votes.
- The winning project can be installed in the community, resulting in a project that people can see and experience.
- Requires a consortium of local partners, bringing them together to reinforce the vision for your downtown and community.
- Involves local residents in the future of their community.
BENEFITS
The community design benefits of the Downtown Bracket Challenge is that it engages people to vote on a project they would like to see installed in their community while resulting in a built, tangible project. Often in community engagement events there is perception that there is a lot of talk with little action. This project allows community input to directly result in a built work. In a bigger picture, the Downtown Bracket can help citizens get involved in the longer term vision for their community through installation of short-term incremental projects that support the bigger picture.
GETTING STARTED
A broad consortium of partners need to be brought on board to execute this project. Partners needed include a local funder, city officials and at least one local nonprofit who could operate the day-to-day operations of the voting boxes and receive the donated items at the end of the project.
Funding is needed to pay for the construction of the voting boxes as well as the installation of the winning project itself. Communities and organizations should consider a modest, yet, reasonable amount of funds. The winning project should be scaled based on available funds. The installations could be temporary or accomplish short-term goals the first time an organization conducts the Downtown Bracket Challenge. An identified pilot project through the Downtown Bracket Challenge allows communities to experience a creative placemaking concept before larger investments are made in the future.
City officials are an important partner in this project. They should be consulted from the very beginning of the project and ideally provide needed feedback throughout the project. This is especially important as the winning project may be installed within the public realm and right-of-way. Important partners include the mayor, the city manager, and public works. Public works are fundamental as they can help with the installation, which can reduce costs.
There are three main phases of this project: identifying the projects which will be included; building voting boxes and executing the bracket process; and the installation of the winning project.
STEP ONE: IDENTIFYING THE PROJECTS
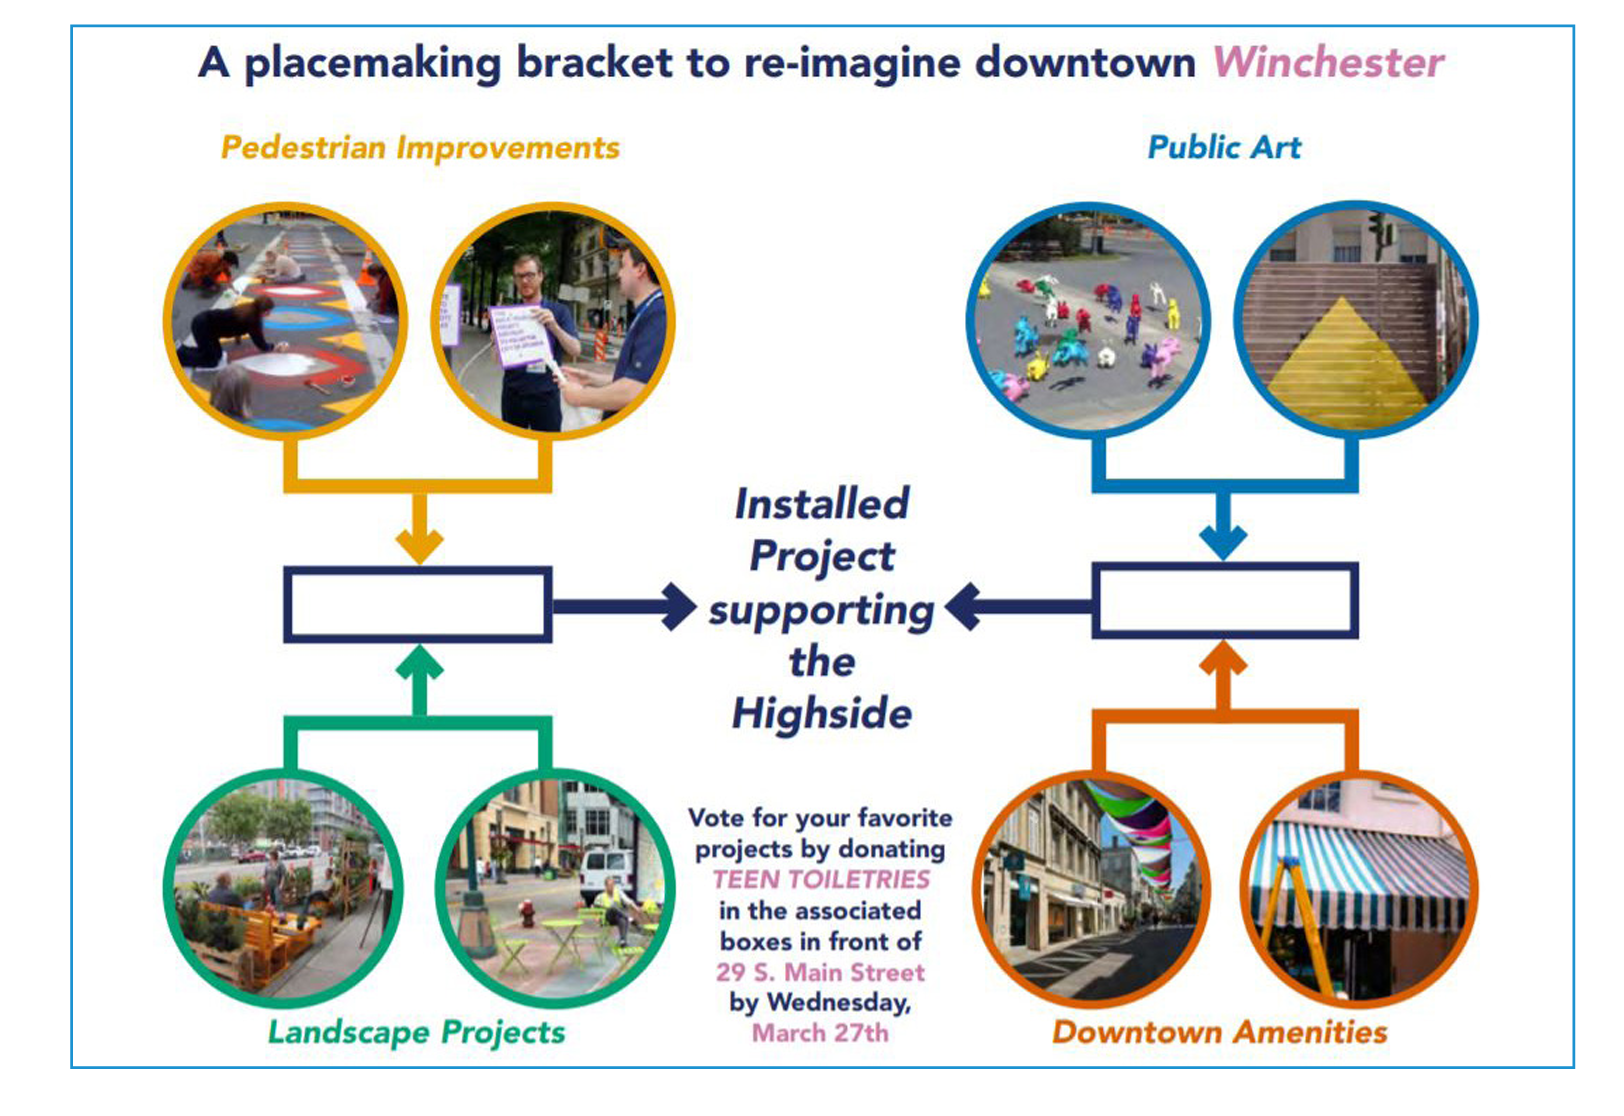
The first phase, identifying the projects, should begin in the months leading up to the voting execution. This allows enough time to identify projects that support a be voting on, it is imperative to choose projects that can be installed with relative ease to meet people’s expectations and within budget. The example pictured below is from Winchester, Kentucky’s 2019 Downtown Bracket Challenge and features the eight of projects that leadership identified for their project. The eight projects were grouped into 4 themes: Pedestrian Improvements, Public Art, Landscape Projects and Downtown Amenities. These projects and themes should be tailored to the goals you are looking to accomplish.
STEP TWO: BUILDING VOTING BOXES AND EXECUTING THE BRACKET PROCESS
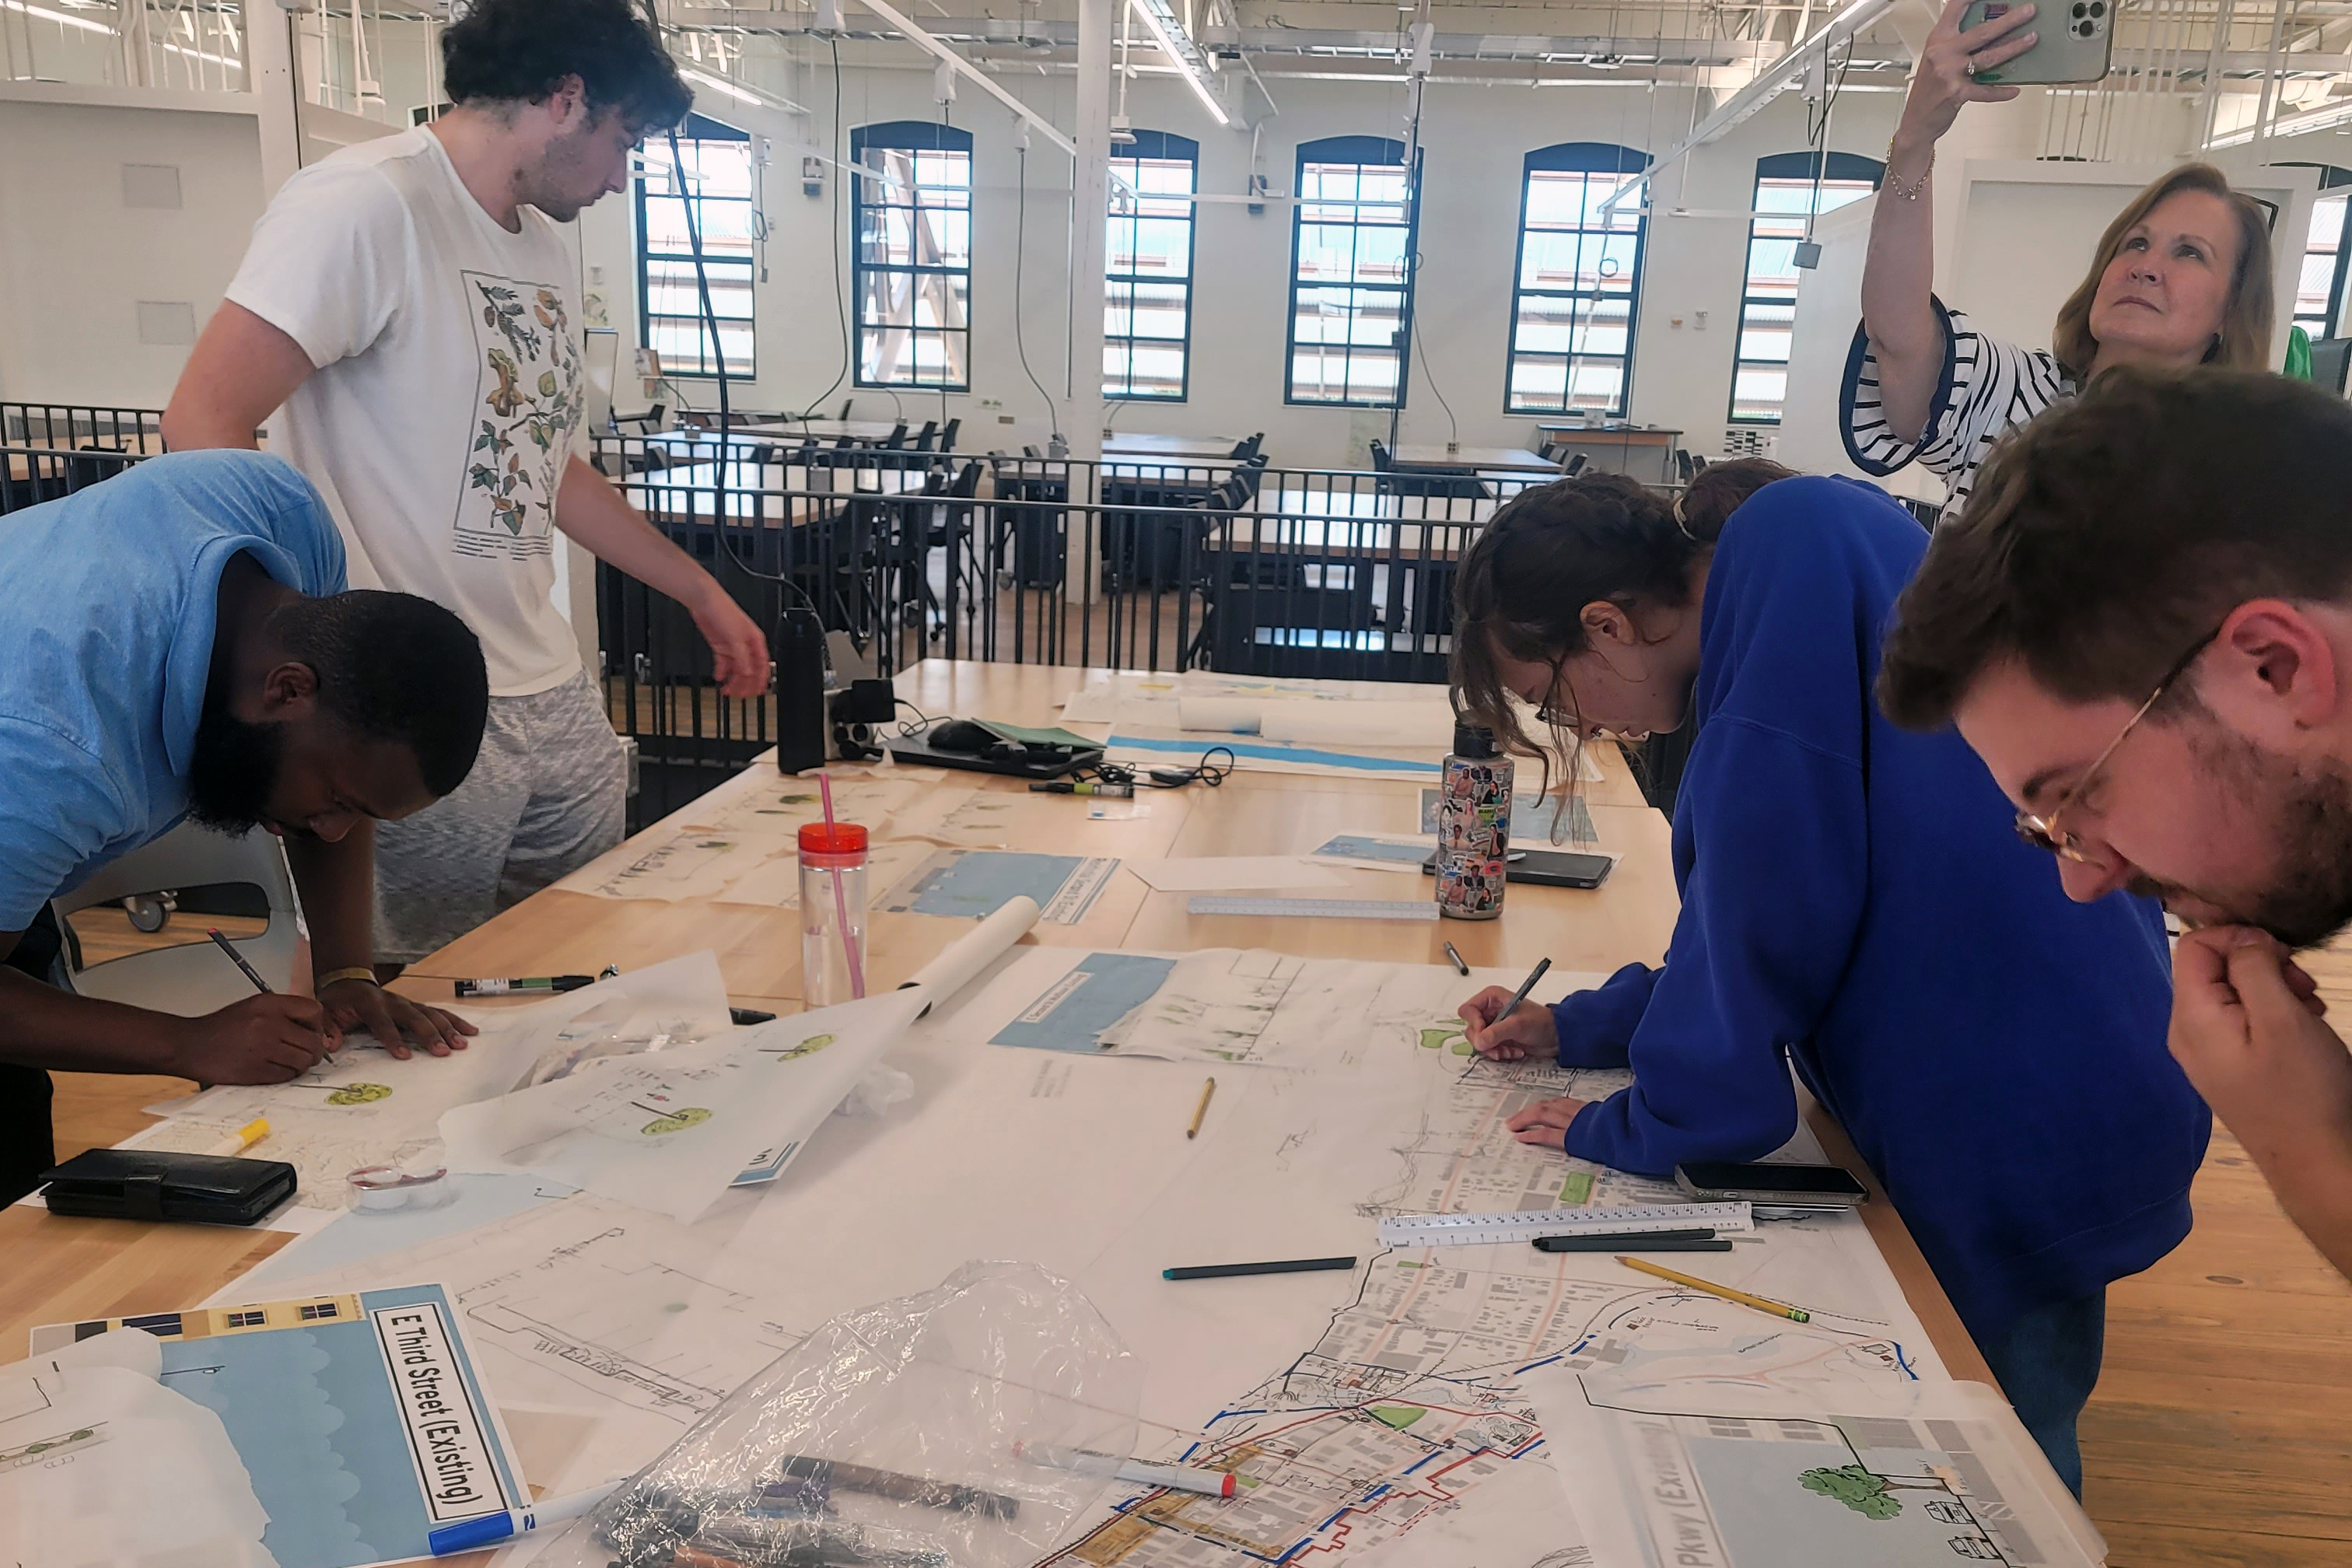
When designing this project, one of the challenges was figuring out how the voting would be undertaken. Seeking to create a system that allowed for tangible items that could be tallied, the solution was to build boxes where people could vote for their preferred project by donating items to local non-profits. A complete how-to construction guide for voting boxes can be downloaded here. The boxes can easily be built over a weekend with supplies sourced from a local hardware store.
Local businesses and the non-profits that will receive the donated items can help set up the voting boxes each day, collect the donated items, and tally the votes. This process helps create shared ownership of the project.
To increase community awareness of the Downtown Bracket Challenge, it is important to engage several types of media, from local radio and television, to newspaper and social media outlets. Likewise, all organizations involved in the project need to be prepared to share information through their communication channels (newsletters and social media for example).
STEP THREE: INSTALLING THE WINNING PROJECT
Once the winning project has been identified by receiving the most votes of donated items, the next step is to figure out the installation. With the main outcome of this challenge to end up with a built project, work with your consortium of partners to determine how to install your project within budget and schedule. In Winchester, the winning project was a shade canopy. Due to site constraints, the installed project evolved to be made of fringe pennants, highlighting the importance of being open to unexpected materials to achieve your goals.
CASE STUDY: WINCHESTER, KENTUCKY
In Winchester where this project was piloted, the overall goal of the project was to support the implementation of their downtown master plan. The eight projects identified for people to vote on were directly chosen from the master plan. They were intended to provide an opportunity to incrementally install a project supporting the master plan while raising awareness about it, and getting people used to seeing and experiencing downtown differently prior to the large scale installation of the plan. After 3 rounds of elimination the winning project was a shade canopy, which was installed over a portion of their sidewalk in the heart of downtown. The project was allocated a $5,000 budget but the final cost of the shade canopy was less than $2,000 and was installed over two days by Public Works. The temporary canopy was made of fringed pennants, which moved with the wind, providing a kinetic feel in addition to color and shade.
DOWNTOWN BRACKET CHALLENGE CHECKLIST
Before the Event
- Identify a specified of projects that support a variety of goals and can be installed on schedule and within budget
- Make sure that each project that it proposed is able to be installed within a given time frame and within budget
- Create a coalition of partners, including a local funder, city officials
- Identify a local non-profit who can operate the day-to-day operations of the voting boxes and receive the donated items at the end of the project, such as a teen center or a food pantry
- Build the voting boxes
- Place the voting boxes in an area where you are looking for the winning projects to be installed, such as your Main St. or a local park
- Develop and distribute promotional materials
During the Event
- Install the voting boxes in a way that they can be removed each evening
- Allow roughly 3 weeks for voting to take place
- Continue to promote the event to the public via local media and social media
- Communicate with the designated local non-profit to make sure things are going as planned
After the Event
- Determine the winning project
- Donate the items to the designated non-profit
- Install the winning project utilizing your coalition of partners
- Observe how people utilize the installed project, and see what improvements can be made for the second generation of a more permanent project
DOWNTOWN BRACKET CHALLENGE VOTING BOXES- HOW TO BUILD IT
The ‘‘Downtown Bracket Challenge’ allows people to vote on which project they would like to see involved in their neighborhood or community by donating pre-identified items. These items are placed by participants into the voting box that is associated with their preferred project, with all donated items going to a local nonprofit after they are counted.
The voting boxes described here are based on our experiences building them in Winchester. Two of us built 4 of the voting boxes over a weekend for under $500.
* The items listed here are to build a single box. Please multiply the supplies if building more than one voting box.
** These are the two primary types of power tools needed. Please follow all safety measures and precautions.
Materials Needed:
- .453” x 7.997’ x 3.997’ Top Choice Blondewood Plywood. The hardware store cut the panels into 2’ x 8’ panels for easier transport.
- 1 1/16” x 12” Continuous Hinge with screws. We used a medium, piano hinge to allow the lid to lift up above the collection sections.
- 1qt Gray primer 2qt Colored paint Painting supplies (rollers, trays, etc.)
- x1 pack 8 x 1-1/2” Wood screws x1 pack #4 x 1/2” Wood screws x1 pack SAE #6 Flat Washers
- 18” x 24” Acrylic Clear Sheet
- Sandpaper
- 1/2” wide weather stripping
Tools Needed:
- Handheld Power Drill. It is important to have a variety of drill bit sizes to use.
- Handheld Circular Saw
HOW TO BUILD IT: Cutting the Wood Panels
- x1 Back panel: 18” x 36”
- x1 Base panel: 12” x 18” x1 Lid: 15” x 14” One long edge of the lid will need to be cut to be flush with the face of the back panel. See step 13.
- x3 Side panels: 11.5” x 20” x 24” The side panels create the two enclosures for voting compartments in the voting boxes. The angle at the top of the panels allows the lid to have an angle to minimize water and the elements from entering.
- x1 Side panel notch: .5” x 5” This panel allows for a cross brace of wood to be installed connecting the three side panels, as well as support for the top of the acrylic panel. The notch is place on the middle side panel when assembling.
- x1 Cross brace: 1.5” x 17” The cross brace connects the top of the side panels and fits flush into the notch cut into the middle side panel in the previous step. NOTE: Use sandpaper to smooth edges and panels faces prior to painting.
- Paint the Wood Panels. After cutting each of the wood panels, sand the edges and paint all sides of each panel. The panels may require more than one coat of paint. Leave the panels overnight to dry before assembling them the next day.
HOW TO BUILD IT: Assembling the Wood Panels
- Attach the Back Panel to the Base. Align the edge of the back panel to the edge of the base panel, and use the power drill to screw the two together. Place a countersink at the location of each screw to allow them to be flush with the face of the panels.
- Attach the Two Outer Side Panels. Attach the outer two side panels to the base and back panels with screws into the bottom and the back.
- Attach the Central Panel. Attach the middle side panel, to the base and back panels. Place the middle panel equally between the two outer side panels.
- Attach the Cross Bar. Place the cross bar into the notch in the middle panel, and attach both through the ends on the out panels and into the front of the cross bar into the middle panel.
HOW TO BUILD IT: Assembling the Lid and Acrylic Panels
- Attach the Acrylic Panel. Cut the acrylic panel to size. It is important to use washers in this step, and to be gentle with the power drill to prevent the acrylic from cracking or shattering.
- Adding the Weatherstripping. Adding weatherstripping to the tops of the side panels serves two main purposes. 1). to help keep the interior dry and 2). provide padding to the lid for when it is lowered.
- Edge of the Lid. Prior to attaching the continuous hinge, lay the lid on top of the side panels to measure the angle of the lid edge that needs to be cut to be flush with the back panel. Per these dimensions the angle is appx. 20 degrees. Attach the Continuous Hinge to the Lid. Center the hinge on the edge of the lid and screw the hinger onto the lid using the screws included with the continuous hinge.
- Attach the Lid to the Back Panel. Placing the lid on top of the side panels, and centered on the voting box, use the remaining screws from the continuous hinge to attach the lid to the back panel.
Related Information